Series OSS Code No. 68
ENGINEERING DRAWING
(Theory)
Time Allowed: 3 Hours Maximum Marks : 70
Note :
(i) Attempt all the questions.
(ii) Use both sides of the drawing sheet, if necessary.
(iii) All dimensions are in millimeters.
(iv) Missing and mismatching dimensions, if any, may be suitably assumed.
(v) Follow the SP : 46-1988 codes.
(with First Angle method of projection).
(vi) In no view of question 1 and in no sectional view of question 3, are hidden edges/lines required.
1.(a) Construct an isometric scale 80 mm long. 4
(b) Construct the isometric projection, to isometric scale, of a hexagonal pyramid (base edge = 30 mm and height = 80 mm) keeping it in the inverted position. The axis is perpendicular to H.P. One base edge is perpendicular to V.P.
Draw the axis and indicate the direction of viewing. Give all dimensions. 7
(c) A cylinder (diameter = 50 mm and height = 70 mm) is placed, centrally, with its circular end on the pentagonal face of a pentagonal prism (base edge = 40 mm and height = 30 mm). The common axis is perpendicular to H.P. The base of the prism is on H.P. and one of its base edges is parallel to V.P. and away from it.
Draw the isometric projection of the solids, placed together, to isometric scale. Draw the common axis and indicate the direction of viewing. Give all dimensions. 14
2. (a) Draw to scale 1 : 1 the standard profile of a B.S.W. thread, taking enlarged pitch = 50 mm. Give all standard dimensions. 9
OR
Draw the full sectional front view and top view of a single riveted lap joint. Take plate thickness = 9 mm. Give all standard dimensions. Use scale 1 : 1.
(b) Sketch free-hand the front view and top view of a 90° flat counter sunk head screw of size M 20, keeping the axis vertical. Give all standard dimensions. 6
OR
Sketch free-hand the front view, top view and side view of a Woodruff key for a shaft of 60 mm diameter. Give all standard dimensions.
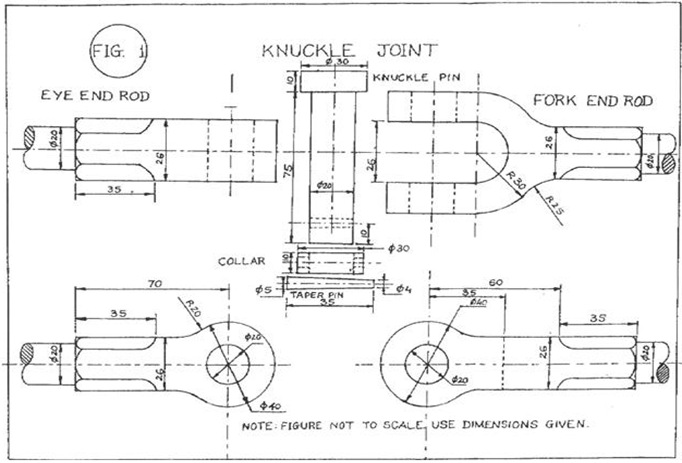
3. Figure 1, shows the details of a knuckle joint. Assemble the parts correctly and then draw, to scale 1 : 1, the front view, lower half in section. 24
Print title and. scale used. Give 8 important dimensions. 6

OR
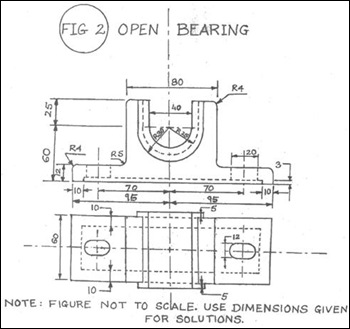
Figure 2, shows the assembly of an open bearing. Disassemble the base and the bush and draw the following views to scale 1 : 1 Keep the same positions of the base and the bush with respect to H.P. and V.P.
(a) Front view of the base, showing right half in section, and its top view. 16
(b) Front view of the bush and full sectional side view, as seen from the left side. 8
Print titles of both and scale used. Draw .the projection symbol. Give8 important dimensions. 6
